

How To Add Item Template To Layout Template List View
Tile View (the TileView class) displays data records as read-only tiles, which can arrange multiple elements (leap and unbound) in any custom fashion. Users tin utilize a separate Edit Form to edit tiles
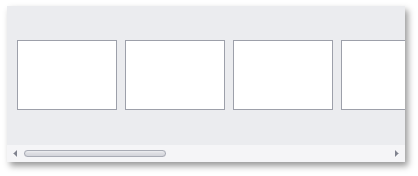
Tile View supports 3 tile layout modes demonstrated in the epitome gallery below:
- Default—Tiles are arranged in multiple columns and rows. Automatic tile wrapping is enabled.
- Kanban—Tiles are combined into groups (you need to specify a group column). Tile wrapping is not supported.
- Listing—Tiles are arranged in column(s)/row(s) with the tile stretch feature enabled.

Tile View - LayoutMode: Default (Tiles are arranged down then across or across so down depending on the orientation)
Data Grouping: Disabled, Orientation: Horizontal, RowCount: three

Tile View - LayoutMode: Default
Information Grouping: Enabled, Orientation: Horizontal, RowCount: 2

Tile View - LayoutMode: Default
Information Grouping: Enabled,Orientation: Horizontal, RowCount: 1

Tile View - LayoutMode: Default
Data Grouping: Enabled, Orientation: Vertical, ColumnCount: 2

Tile View - LayoutMode: Default
Data Grouping: Enabled, Orientation: Vertical, ColumnCount: 1

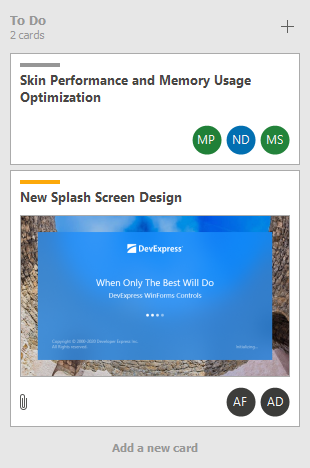
Tile View - LayoutMode: Kanban (Each group arranges tiles in a single column; Independent column scrolling)
Information Grouping: Enabled, Orientation: Horizontal

Tile View - LayoutMode: Kanban (Each group arranges tiles in a single row; Contained row scrolling)
Data Grouping: Enabled, Orientation: Vertical

Tile View - LayoutMode: List (Tiles are arranged in one/multiple columns while stretching to fit the View'due south width)
Data Group: Enabled, Orientation: Vertical, ColumnCount: 1

Tile View - LayoutMode: Listing (Tiles are arranged in one/multiple columns while stretching to fit the View'due south width)
Information Grouping: Enabled, Orientation: Vertical, ColumnCount: ii

Tile View - LayoutMode: List (Tiles are arranged in ane/multiple rows while stretching to fit the View'due south height)
Information Group: Enabled, Orientation: Horizontal, RowCount: ane

Tile View - LayoutMode: List (Tiles are arranged in one/multiple rows while stretching to fit the View'southward height)
Data Group: Enabled, Orientation: Horizontal, RowCount: 2
The chief Tile View features are as follows:
- Tiles are generated from tile templates.
- Design-fourth dimension tile template setup.
- Dynamic tile template substitution at runtime.
- The Tile template supports bound and unbound elements. Bound elements display data from underlying data source fields. Unbound elements prove static text and images.
- Multiple tile element alignment options, including alignment relative to other elements, and absolute or relative element size specification.
- Tile grouping by a column.
- Support for tile checking.
- Data editing (using a separate Edit Class).
- Tile option.
- Tile elevate-and-drop.
- Tile motorcar-height.
Demos
- Tile View
- Tile View Kanban Board
- Function Compact View
Online Videos
-
Tile View - Basics
This video shows how to switch the usual grid data layout to the Tile View, which displays data records as tiles. You will acquire the basics of tile template configuration, such as how to add information bound and unbound elements and position them within the template.
Scout on YouTube…
-
Tile View - Layout & Appearance
Learn how to add items to tiles, custom arrange these items and ready up item appearance.
Watch on YouTube…
-
Tile View - Service Columns & Dynamic Tile Customization
In this video, you will learn how to apply data group to the Tile View, how to control the enabled state or check the status of tiles depending on a field value, and how to use a specially designed issue to customize tile items.
Watch on YouTube…
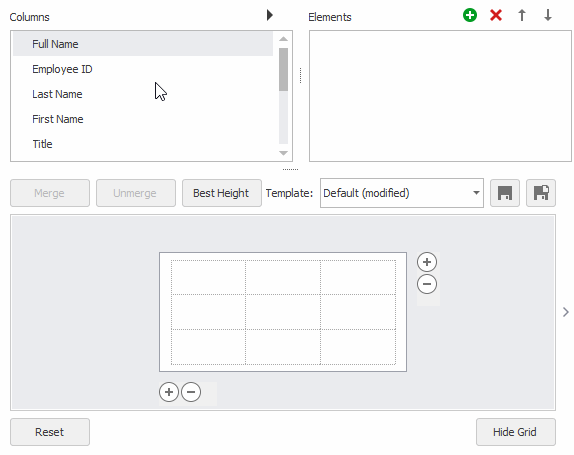
Create Tile View, Bind It to Data, and Populate Column Collection
When you create a GridControl, it contains a Filigree View that displays data in the column and row format. To convert this View to a TileView at design time, utilize the Data Filigree'southward Level Designer.
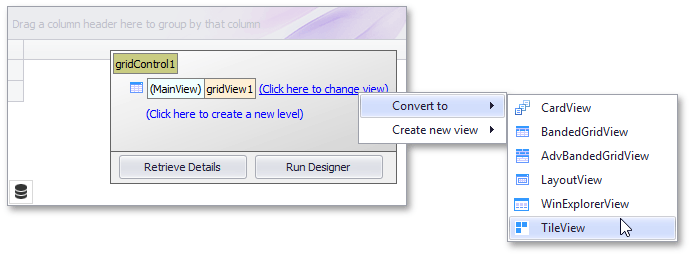
To supply data to the Tile View, bind the Data Grid to a data source with the GridControl.DataSource and GridControl.DataMember properties. At blueprint time, yous tin can use the filigree control's smart tag.
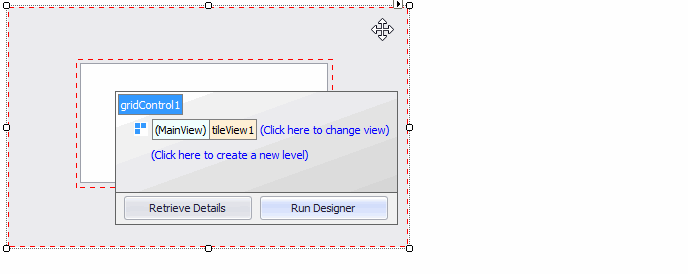
The post-obit lawmaking creates a TileView, sets information technology equally a grid command's MainView, and so binds the data source to the grid control.
- C#
- VB.Cyberspace
TileView tileView1 = new TileView(); gridControl1.MainView = tileView1; gridControl1.DataSource = employeesBindingSource; One time the information grid is bound to data, the Tile View (equally with any other View) automatically creates columns (GridColumn objects) for all data source fields.
Note
The column collection (ColumnView.Columns) is not automatically populated if a View already contains columns.
You lot can utilise the Data Grid's main Designer to bank check the contents of the newly created column collection. Click the Run Designer button and then switch to the Columns Page.
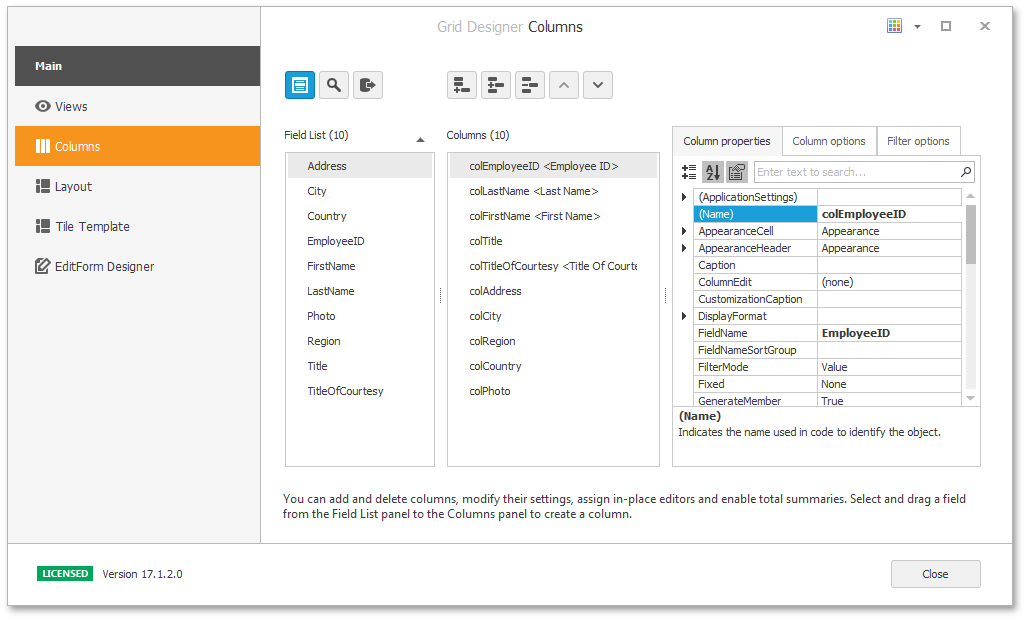
The Columns Designer page allows you to manipulate the cavalcade collection. For instance, y'all tin manually create columns and demark them to certain information source fields (run into GridColumn.FieldName). You lot tin as well create unbound columns to brandish data calculated using a custom expression or a dedicated event.
Note that if yous run the awarding at present, you may see empty tiles (each tile is a data source record). The created columns are not visible, as they have not notwithstanding been added to a tile template.
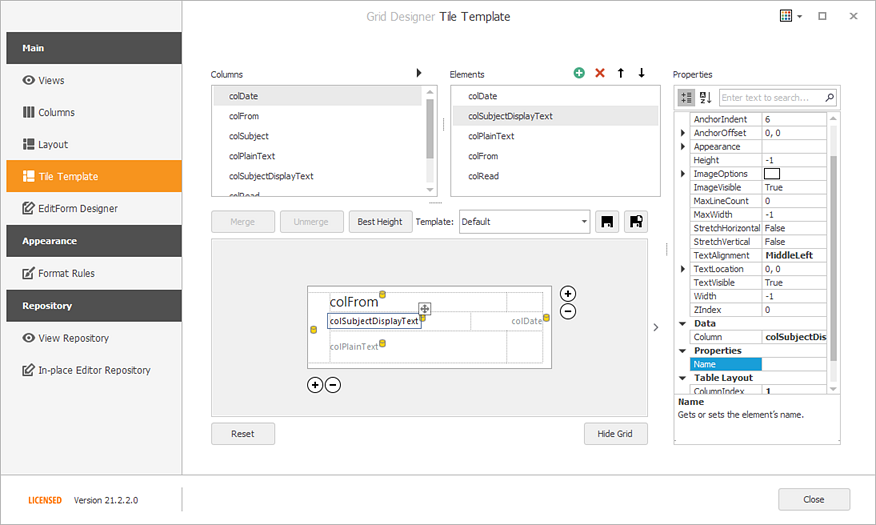
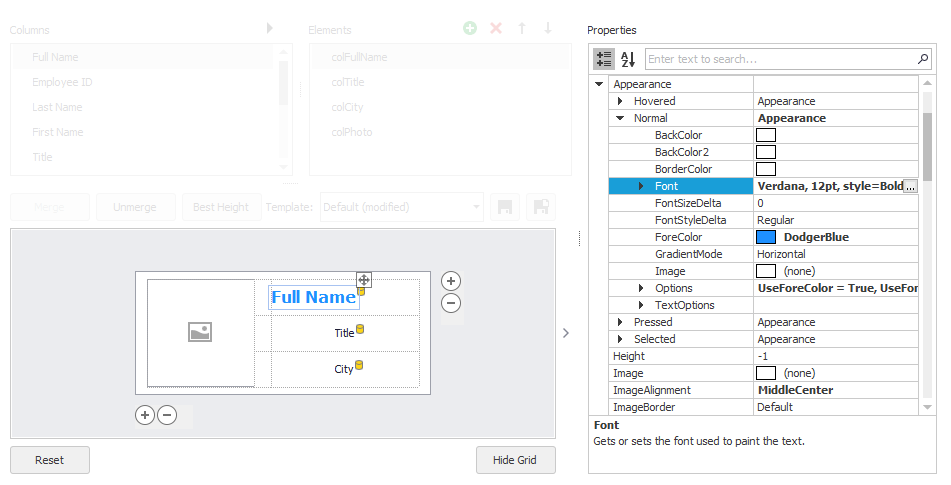
Create Tile Template
Tile View generates tiles from templates. A template specifies the layout of elements inside a tile, and their advent settings. Two template types are supported:
- Regular template
- HTML and CSS-based template (CTP)
Regular Tile Template
In a regular tile template, the design surface is divided into logical columns and rows, and the contents are placed in corresponding cells.
Yous tin can use the Data Filigree's Designer to customize the regular tile template at blueprint fourth dimension.
Below is a sample Tile View whose tiles are generated from the template above.
The following animation demonstrates how you can prepare a tile template in the Data Grid's Designer:
The supported tile template customization actions include:
-
Drag-and-drop grid columns from the Columns list onto the table cells.
When you drib a column onto a jail cell, a spring tile chemical element (TileViewItemElement) is automatically created.
- Drag-and-drop created elements between cells.
- Identify multiple elements in the same cell, with unlike alignment options for these elements to prevent overlap.
- Select cells with the mouse pointer and click the Merge push to merge cells.
- Unmerge previously merged cells with the Unmerge button.
- Resize cells with the mouse pointer.
- Drag a tile template's edges with a mouse pointer to resize it.
-
Add/remove columns and rows with the
 buttons and context carte.
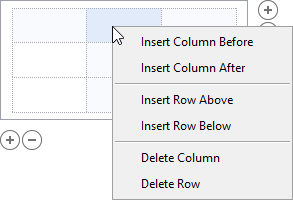
-
Click a cell to select it, and customize the jail cell's size, size blazon (absolute or relative), and padding in the Property Filigree.
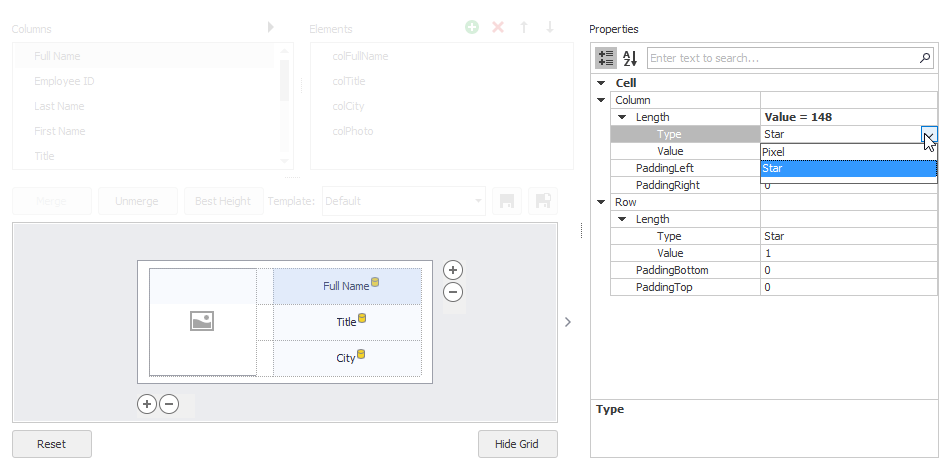
-
Click a dropped element to access it and customize its settings in the Property Grid.
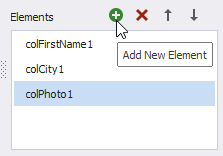
- Add, delete, and reorder elements in the Elements list. When yous create an element, it is automatically added to the template.
- Use the Relieve As push button to save the current template with a different proper noun and create multiple templates. Multiple templates are useful if you use the TileView.CustomItemTemplate consequence to dynamically assign different templates to tiles.
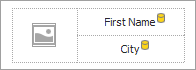
The following code sets up the default tile template that consists of two rows and two columns. The first cavalcade's cells are merged. 3 tile elements are positioned inside cells to form the post-obit layout:
- C#
- VB.NET
using DevExpress.XtraEditors; using DevExpress.XtraEditors.TableLayout; using DevExpress.XtraGrid.Views.Tile; private void InitTileTemplate() { // Set the tile size. tileView1.OptionsTiles.ItemSize = new System.Drawing.Size(196, seventy); // Create a tabular array layout (columns and rows) for the Tile Template. TableColumnDefinition tableColumn1 = new TableColumnDefinition(); TableColumnDefinition tableColumn2 = new TableColumnDefinition(); TableRowDefinition tableRow1 = new TableRowDefinition(); TableRowDefinition talbeRow2 = new TableRowDefinition(); tableColumn1.Length.Value = 82; tableColumn2.Length.Value = 132; tileView1.TileColumns.Add(tableColumn1); tileView1.TileColumns.Add(tableColumn2); tileView1.TileRows.Add(tableRow1); tileView1.TileRows.Add(talbeRow2); // Create a TableSpan object to merge cells. TableSpan tableSpan1 = new TableSpan(); tableSpan1.RowIndex = 0; tableSpan1.ColumnIndex = 0; tableSpan1.RowSpan = 2; tileView1.TileSpans.Add together(tableSpan1); // Create the Tile Template'due south elements. TileViewItemElement tileElementFirstName = new TileViewItemElement(); TileViewItemElement tileElementCity = new TileViewItemElement(); TileViewItemElement tileElementPhoto = new TileViewItemElement(); tileElementFirstName.Column = tileView1.Columns["FirstName"]; tileElementFirstName.ColumnIndex = one; tileElementFirstName.ImageOptions.ImageAlignment = TileItemContentAlignment.MiddleCenter; tileElementFirstName.ImageOptions.ImageScaleMode = TileItemImageScaleMode.Squeeze; tileElementFirstName.TextAlignment = DevExpress.XtraEditors.TileItemContentAlignment.MiddleCenter; tileElementCity.Column = tileView1.Columns["City"]; tileElementCity.ColumnIndex = i; tileElementCity.ImageOptions.ImageAlignment = TileItemContentAlignment.MiddleCenter; tileElementCity.ImageOptions.ImageScaleMode = TileItemImageScaleMode.Squeeze; tileElementCity.RowIndex = ane; tileElementCity.TextAlignment = DevExpress.XtraEditors.TileItemContentAlignment.MiddleCenter; tileElementPhoto.Cavalcade = tileView1.Columns["Photo"]; tileElementPhoto.ImageOptions.ImageAlignment = TileItemContentAlignment.MiddleCenter; tileElementPhoto.ImageOptions.ImageScaleMode = TileItemImageScaleMode.Squeeze; tileElementPhoto.TextAlignment = TileItemContentAlignment.MiddleCenter; tileView1.TileTemplate.Add together(tileElementFirstName); tileView1.TileTemplate.Add(tileElementCity); tileView1.TileTemplate.Add(tileElementPhoto); } HTML and CSS-based Tile Template
Tile View allows you to use HTML and CSS markup to set up tile templates.
Notation
Back up for HTML and CSS-based UI blueprint in controls is nether active development and is available equally a Customs Engineering science Preview (CTP). We appreciate your feedback on how you build desktop UIs with HTML and CSS.
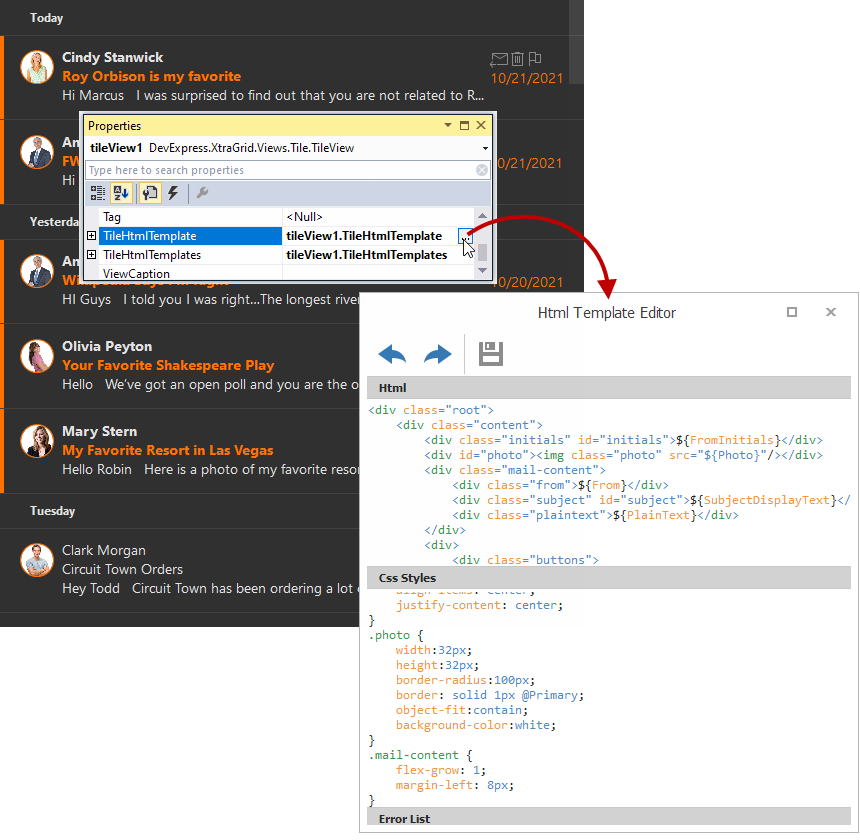
Click the ellipsis button for the TileView.TileHtmlTemplate property in the Backdrop filigree to open the Html Template Editor. Specify HTML code and CSS styles, and save the changes.
See the following demo to find the consummate code that renders this UI:
Annotation
The HTML/CSS-aware controls and components support a express prepare of HTML tags and CSS styles, listed in the following topics:
- HTML Tags
- CSS Styles
The principal features of HTML-CSS templates include:
- Data bounden
- The
${FieldName}syntax in HTML markup inserts values of fields from the control's data source. See Data Bounden. - Images
- The
<img>HTML tag allows you lot to add together images - Buttons
- The HTML-CSS markup allows you to add elements to emulate buttons.
- Mouse actions
-
Tile View contains events to respond to mouse actions on HTML elements: TileView.HtmlElementMouseClick, TileView.HtmlElementMouseDown, TileView.HtmlElementMouseOut, TileView.HtmlElementMouseOver, and TileView.HtmlElementMouseUp.
You can also subscribe to mouse events for elements in HTML markup, and when using Fluent API.
Encounter the following topic for more information: HTML-CSS-based Desktop UI
Tile Element Contents and Alignment
In a regular tile template, a bound tile element obtains a display value from the linked cavalcade. The cavalcade'south data type is automatically determined, and thus the tile element automatically chooses the data to brandish: either text or image.
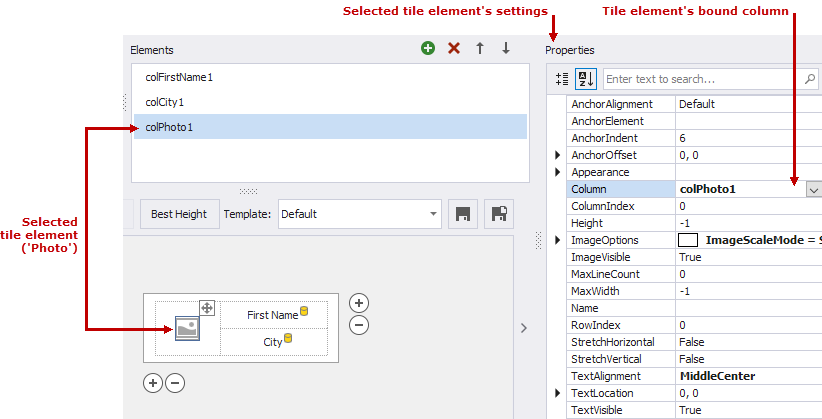
If yous need to brandish an boosted label or image adjacent to a tile element, add a new unbound tile chemical element.
Specify data for an unbound tile element with the TileItemElement.Text and TileItemElement.ImageOptions properties.
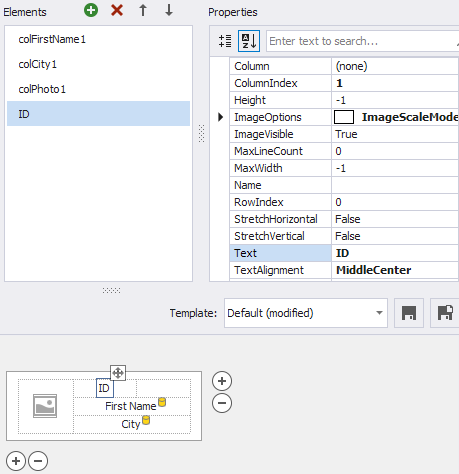
The post-obit code creates an unbound element that displays the "ID" string:
- C#
- VB.NET
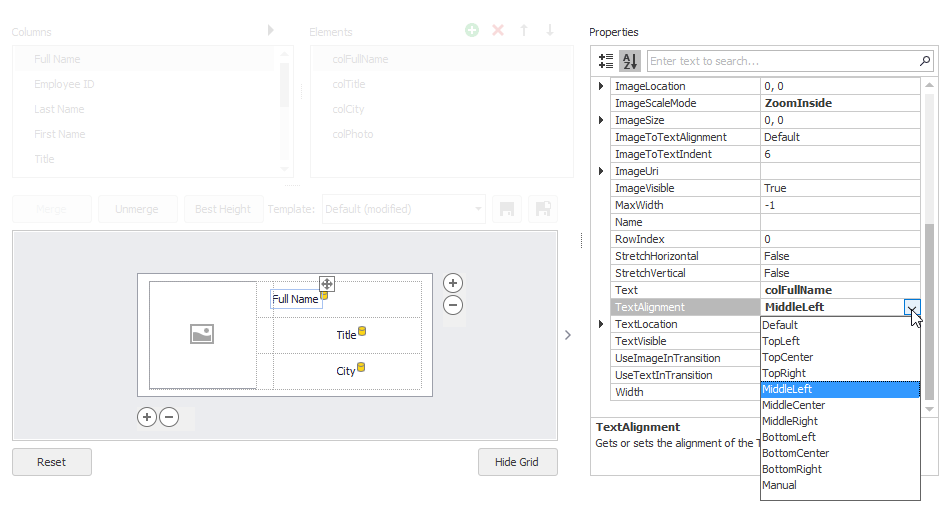
TileViewItemElement tileElementID = new TileViewItemElement(); tileElementID.ColumnIndex = 1; tileElementID.RowIndex = 0; tileElementID.Text = "ID"; tileElementID.TextAlignment = TileItemContentAlignment.MiddleCenter; tileView1.TileTemplate.Add together(tileElementID); To specify the alignment of an element'south text data relative to the image, see TileItemElement.ImageOptions.ImageToTextAlignment.
Tile elements are initially centered vertically and horizontally within cells. There are two options to marshal elements:
- Marshal an element within a cell with the TileItemElement.TextAlignment (for text data) and TileItemElement.ImageAlignment (for graphics) properties.
- Align an chemical element relative to another element with the TileItemElement.AnchorElement and TileItemElement.AnchorAlignment properties.
Notation
TileView does not back up repository items and does not employ them to render Tile Detail element content.
Tile Size and Layout
Tile organization depends on the currently selected layout fashion and orientation.
Layout Mode
The TileView.OptionsTiles.LayoutMode property specifies how tiles are bundled within the View, and how an end user scrolls through tiles.
The following layout modes are available:
- Default—Tiles are arranged in multiple columns and rows. Automated tile wrapping is enabled.
- Kanban—This fashion is tailored to group tiles past a cavalcade, and access each group content independently of other groups (using independent group scrolling). Tile wrapping is disabled. For more information, see Kanban Board.
- List—Tiles are arranged in column(s)/row(s) with the tile stretch feature enabled.
The following prototype gallery demonstrates these layout modes:
Tile View - LayoutMode: Default
Orientation: Horizontal, RowCount: three

Tile View - LayoutMode: Default
Orientation: Vertical, ColumnCount: three
Tile View - LayoutMode: Kanban
Orientation: Horizontal

Tile View - LayoutMode: Kanban
Orientation: Vertical

Tile View - LayoutMode: List
Orientation: Horizontal

Tile View - LayoutMode: List
Orientation: Vertical
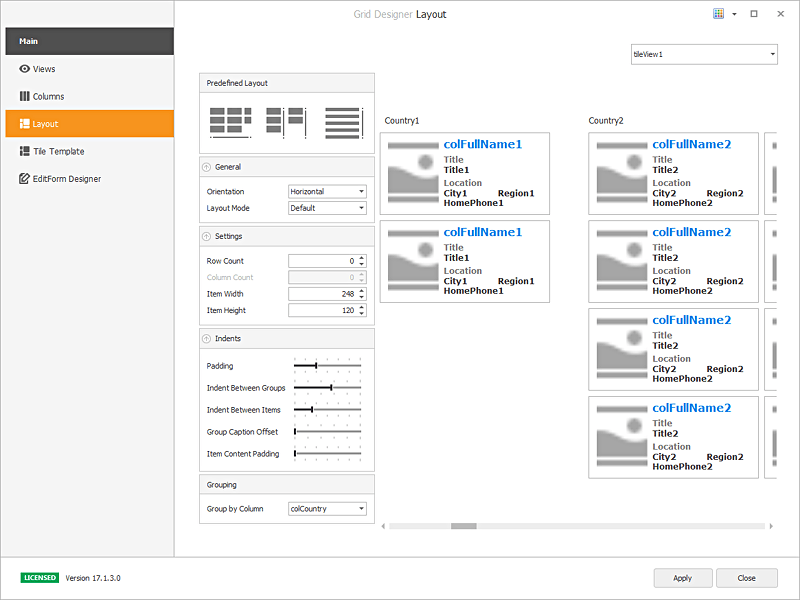
At pattern time, y'all can choose the layout mode and customize the master layout settings from the Data Grid Designer's Layout page.
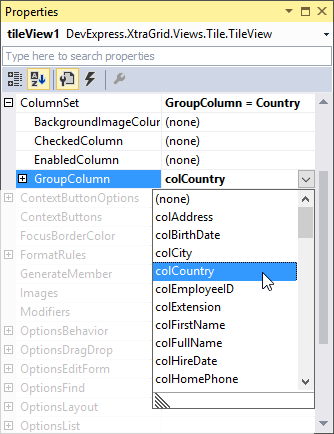
The following code switches a Tile View to Kanban manner, and groups tiles by the Country cavalcade:
- C#
- VB.Internet
tileView1.OptionsTiles.LayoutMode = TileViewLayoutMode.Kanban; tileView1.ColumnSet.GroupColumn = tileView1.Columns["Country"]; Layout, Orientation, and Size Settings
Y'all can access these settings from the TileView.OptionsTiles object. The master settings include:
- TileView.OptionsTiles.Orientation—Gets or sets the mode tiles are arranged, horizontally or vertically.
- TileView.OptionsTiles.RowCount - Specifies the row count in the horizontal orientation in Listing layout mode. In Default layout way, this property specifies the maximum number of rows.
- TileView.OptionsTiles.ColumnCount—Specifies the cavalcade count in the vertical orientation in List layout fashion. In Default layout manner, this holding specifies the maximum number of columns.
- TileView.OptionsTiles.ItemSize—Gets or sets the size of tiles inside this TileView.
- TileView.OptionsTiles.StretchItems—Gets or sets whether tiles are stretched to fit the View's width/superlative (depending on the Orientation setting). The holding is ignored in List layout mode.
- TileView.OptionsTiles.Padding—Gets or sets the current TileView padding.
- TileView.OptionsTiles.IndentBetweenGroups—Gets or sets the distance between neighboring tile groups.
- TileView.OptionsTiles.IndentBetweenItems—Gets or sets the distance between neighboring tiles within this TileView.
- TileView.OptionsTiles.GroupTextOffset—Gets or sets the horizontal get-go of the group header, in pixels.
- TileView.OptionsTiles.GroupTextToItemsIndent—Gets or sets the indent betwixt the group header and group items, in pixels.
- TileView.OptionsTiles.ItemPadding—Gets or sets the padding for all tiles inside the TileView.
Tile Car-Acme
Demo: Office Compact View
When you create a tile template, you lot can enable auto-elevation way for a specific template row. This allows tiles to have unlike heights depending on their contents.
Come across the post-obit assistance topic for more information: TableRowDefinition.AutoHeight.
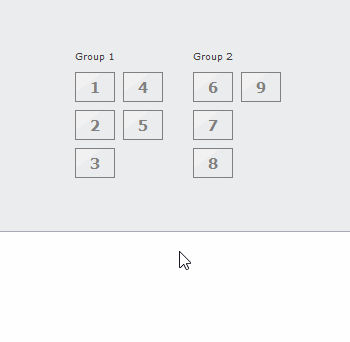
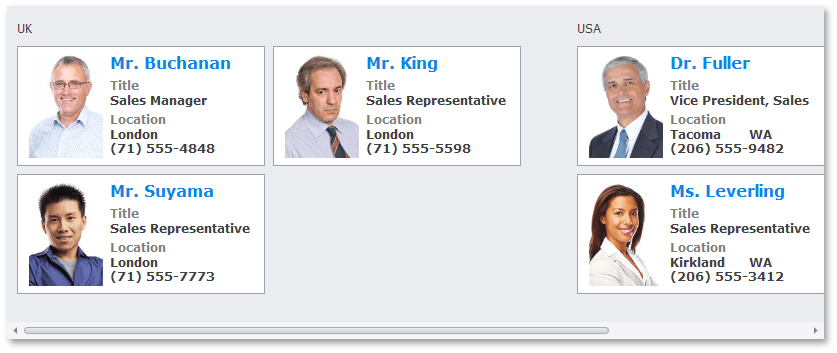
Data Grouping
The Tile View can group its tiles by any 1 column (tiles cannot be grouped by multiple columns). All tiles with identical group column values are combined into the aforementioned tile group (a TileViewGroup object). The post-obit image shows a sample Tile View, whose data is grouped past the Country column:
Assign a group-past-cavalcade to the TileView.ColumnSet.GroupColumn property to enable data grouping.
- C#
- VB.NET
tileView1.ColumnSet.GroupColumn = tileView1.Columns["Land"]; Related API
- TileView.Appearance.Grouping
- TileViewItemOptions.GroupTextPadding
- TileViewItemOptions.IndentBetweenGroups
- TileViewItemOptions.ShowGroupText
Tile Check State
Whatsoever Boolean column can control the checked country of tiles. Checked tiles are displayed with a check mark at their superlative correct corner, as the figure below illustrates.
Set the TileView.ColumnSet.CheckedColumn property to specify the column that determines the tile check state.
- C#
- VB.NET
tileView1.ColumnSet.CheckedColumn = tileView1.Columns["IsSelected"]; If the check column is specified, users can right-click tiles to toggle the tile check state. This activeness fires the TileView.ItemRightClick and TileView.ItemCheckedChanged events.
Tile Enabled State
Like to the checked cavalcade, you can specify a Boolean column that controls the enabled state of each tile. Assign this column to the TileView.ColumnSet.EnabledColumn property.
- C#
- VB.NET
tileView1.ColumnSet.EnabledColumn = tileView1.Columns["IsEnabled"]; The figure below illustrates the visual difference between enabled and disabled tiles. Users are not able to collaborate with disabled tiles (for instance, they cannot right-click a tile to modify its check land).
Tile Groundwork Epitome
You tin can brandish images from a specific filigree column equally tile groundwork images. To do this, assign this column to the TileView.ColumnSet.BackgroundImageColumn property.
- C#
- VB.NET
tileView1.ColumnSet.BackgroundImageColumn = tileView1.Columns["BackImage"]; To custom align background images and modify their scale style, use the TileViewItemOptions.ItemBackgroundImageAlignment and TileViewItemOptions.ItemBackgroundImageScaleMode properties respectively.
Customize Private Tiles
All tiles are initially generated from the default template specified by the TileView.TileTemplate property. You can handle the TileView.CustomItemTemplate event to dynamically supplant the default template with some other one for individual or all tiles based on custom logic.
You can utilise the Data Grid Designer's Tile Template folio to create predefined tile templates beforehand. These templates are stored in the TileView.Templates collection.
The following lawmaking applies a CustomTemplate template to tiles that comprise "United kingdom of great britain and northern ireland" in the 'Country' field:
- C#
- VB.Net
private void tileView1_CustomItemTemplate(object sender, TileViewCustomItemTemplateEventArgs e) { TileView tileView = sender as TileView; cord land = tileView1.GetRowCellDisplayText(east.RowHandle, "Country"); if (country == "UK") e.Template = e.Templates["CustomTemplate"]; } Some other event that helps yous customize the contents and appearance settings of private elements in a tile is TileView.ItemCustomize.
The lawmaking beneath handles this event to alter the contents and background color of tile elements.
- C#
- VB.NET
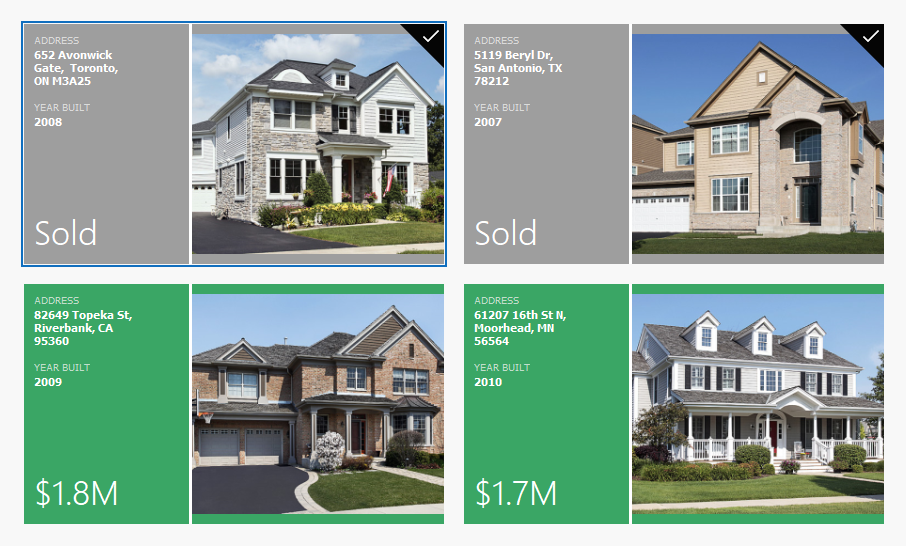
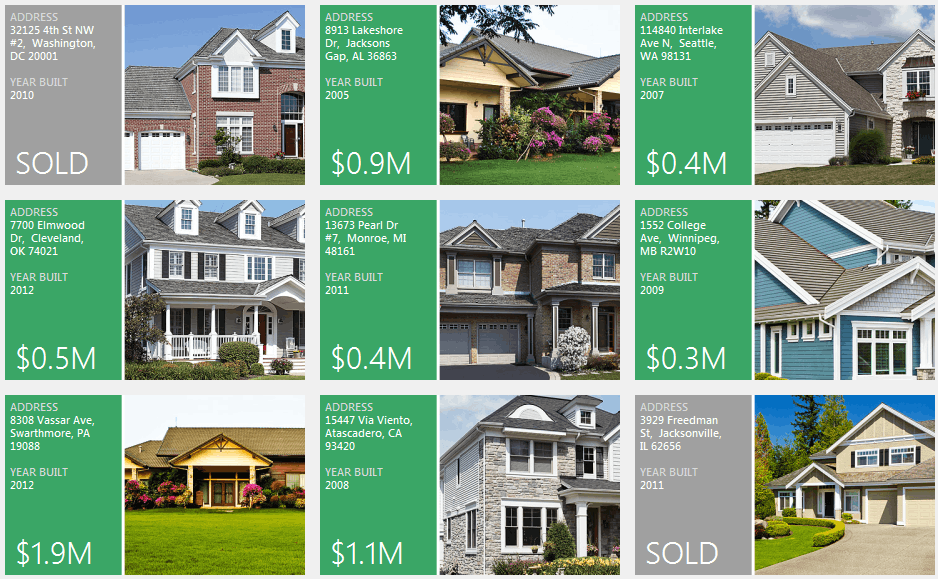
private void tileView1_ItemCustomize(object sender, DevExpress.XtraGrid.Views.Tile.TileViewItemCustomizeEventArgs east) { eastward.Item.Elements[6].Text = Cord.Format("${0}Thou", ((Decimal)(Int32)tileView1.GetRowCellValue(e.RowHandle, colPrice) / 1000000).ToString("0.0")); if ((bool)tileView1.GetRowCellValue(e.RowHandle, colSold) == true) { e.Item.Elements[1].Paradigm = global::TileViewHomes.Backdrop.Resources.gray_element; e.Item.Elements[vi].Text = "SOLD"; } } The following effigy illustrates the outcome:
Tile Option
Use the TileView.OptionsSelection.MultiSelect property to enable multiple tile selection. You lot tin additionally enable the TileView.OptionsSelection.AllowMarqueeSelection property to allow users to select tiles past dragging the mouse arrow over them with the left mouse button pressed.
- C#
- VB.Net
tileView1.OptionsSelection.MultiSelect = true; tileView1.OptionsSelection.AllowMarqueeSelection = truthful; Related API
- TileView.Appearance.ItemSelected—Specifies the advent settings used to pigment selected tiles.
- ColumnView.GetSelectedRows()—Returns the handles of currently selected tiles.
- ColumnView.SelectedRowsCount—Returns the number of selected tiles.
- ColumnView.SelectRow(Int32)—Allows you to select a specific tile.
- ColumnView.SelectAll()—Selects all tiles.
- ColumnView.SelectRange(Int32, Int32)—Selects a continuous range of tiles.
Context Buttons
Tile View can display context buttons for its tiles.
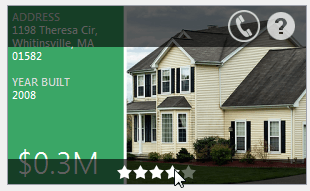
The TileView.ContextButtons property allows you lot to apply a set of context buttons to each tile. If required, you lot can handle a defended result to dynamically modify the availability of context buttons for sure tiles. See the following help topic to learn more than: TileView.ContextButtons.
Appearance and Conditional Formats
Appearance settings for tiles and their elements tin can be adjusted at three levels:
- Tile View appearance settings (TileView.Advent)—These are the default appearance settings for all tiles and tile elements.
- Tile advent settings (TileItem.Appearance)—These override the default appearance settings. Handle the TileView.ItemCustomize event to customize the tile advent settings.
-
Tile element appearance settings (TileItemElement.Appearance)—These settings override the appearance settings of the Tile View and tiles. Handle the TileView.ItemCustomize effect to customize tile element appearance settings in code. At blueprint time, you tin customize these settings in the Information Grid Designer's Tile Template page (see the prototype below).
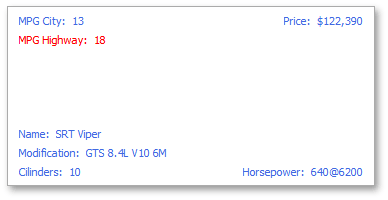
The figure below demonstrates a tile with all tile elements (except 1) painted with a blue color, which is ready as default. The MPG Highway element overrides this setting to display a cherry foreground color.
You can use the TileView.Advent.GroupText belongings to customize the appearance of grouping captions. All tile groups apply the aforementioned appearance settings.

Conditional Formats
Tile View allows you to utilise conditional formats to change the advent of tiles or individual tile elements based on field values:
- Alter the advent settings of tile elements that see specific criteria.
- Highlight smallest/largest values, unique/indistinguishable values, or values that are below or above boilerplate.
- Classify column values into several ranges, and brandish a specific icon for each range.
- Employ a gradation of two or 3 colors to display data distribution and variation.

To add a conditional format at design fourth dimension, invoke the Grid Designer, switch to the Appearance->Format Rules tab and click the "+" button.
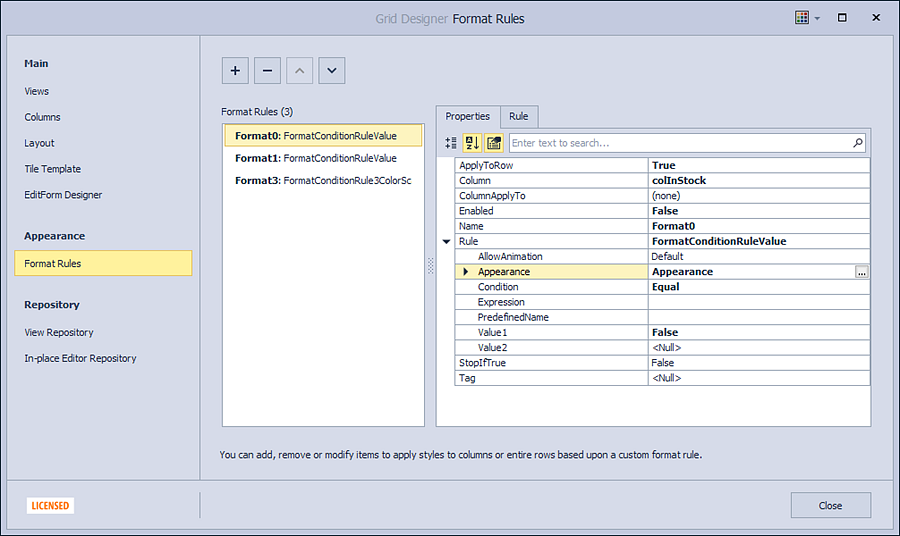
Practise the following to add a conditional format in code:
- Create a GridFormatRule object and add it to the TileView's FormatRules drove.
- Create a dominion (a FormatConditionRuleBase descendant) and assign it to the GridFormatRule.Rule property.
- Modify dominion backdrop to specify the rule criteria, cutoff values, visualization effects, then forth.
Instance
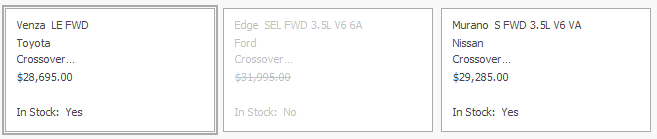
The code beneath creates two provisional formats that are applied if a product is out of stock:
- A format that changes the tile text color to Silvery.
- A format that strikes through "Price" field values.
- C#
- VB.NET
DevExpress.XtraGrid.GridFormatRule formatRule1 = new DevExpress.XtraGrid.GridFormatRule(); formatRule1.ApplyToRow = true; // Use the format to tiles. formatRule1.Column = colInStock; DevExpress.XtraEditors.FormatConditionRuleValue ruleGrayOutText = new DevExpress.XtraEditors.FormatConditionRuleValue(); ruleGrayOutText.Appearance.ForeColor = Arrangement.Drawing.Color.Silver; ruleGrayOutText.Condition = DevExpress.XtraEditors.FormatCondition.Expression; ruleGrayOutText.Expression = "[InStock] = False"; formatRule1.Rule = ruleGrayOutText; DevExpress.XtraGrid.GridFormatRule formatRule2 = new DevExpress.XtraGrid.GridFormatRule(); formatRule2.Column = colInStock; formatRule2.ColumnApplyTo = colPrice; DevExpress.XtraEditors.FormatConditionRuleValue ruleStrikethroughText = new DevExpress.XtraEditors.FormatConditionRuleValue(); ruleStrikethroughText.Advent.FontStyleDelta = FontStyle.Strikeout; ruleStrikethroughText.Condition = DevExpress.XtraEditors.FormatCondition.Expression; ruleStrikethroughText.Expression = "[InStock] = False"; formatRule2.Rule = ruleStrikethroughText; tileView1.FormatRules.Add(formatRule1); tileView1.FormatRules.Add together(formatRule2); Drag-and-drop
The TileViewOptionsDragDrop.AllowDrag property enables built-in drag-and-drop of tiles inside the current Tile View. Handle dedicated events to perform actions during tile elevate-and-drop operations.
Related API
- TileViewOptionsDragDrop.ShowDropIndicators
- TileView.BeforeItemDrag
- TileView.BeforeItemDrop
- TileView.ItemDrop
To enable drag-and-drop of tiles to/from another Tile View and Filigree View, use Drag And Drib Behavior (part of the BehaviorManager component).
Run across Likewise

How To Add Item Template To Layout Template List View,
Source: https://docs.devexpress.com/WindowsForms/114728/Controls-and-Libraries/Data-Grid/Views/Tile-View
Posted by: schuetzprould.blogspot.com
0 Response to "How To Add Item Template To Layout Template List View"
Post a Comment